Rspamd quick start
{:.no_toc}
This guide outlines the primary procedures for obtaining and initiating work with Rspamd. Specifically, we will cover the following setup:
- Ubuntu Jammy (or another OS with systemd)
- Postfix MTA
- Redis cache
- Dovecot with Sieve plugin to sort mail and learn by moving messages to
Junkfolder
Alternative guides (3rd party)
- An alternative introduction to rspamd configuration{:target="_blank"} - this guide delves into the intricacies of Rspamd configuration files and their significance from a sysadmin perspective, focusing on the crucial inquiries of "What can be configured?" and "How do I go about configuring it?".
- Own mail server based on Dovecot, Postfix, MySQL, Rspamd and Debian 9 Stretch{:target="_blank"} - this manual serves as a comprehensive tutorial for setting up your own mail server. It is important to note that the suggestion of adding
level = errorto /etc/rspamd/local.d/logging.inc is not correct. In most cases, it is advisable to utilize the defaultinfolevel or opt forsilentif you only wish to log crucial information. - A guide to self-hosting your email on FreeBSD using Postfix, Dovecot, Rspamd, and LDAP.{:target="_blank"} - similar to the previous guide but uses a different technologies stack. It is important to note that the recommendation regarding the
url_tagmodule should be disregarded.
Preparation steps
First of all, you need a working MTA that can send and receive email for your domain using SMTP protocol. This guide covers the setup of the Postfix MTA{:target="_blank"}, but note that Rspamd can also work with other MTA software. For more information, see the integration document. Keep in mind that Exim MTA has limited support for Rspamd, so it's not recommended to run them together.
You should also consider to setup your own local DNS resolver.
TLS Setup
It is highly recommended to set up Transport Layer Security (TLS) for your mail system. To make it easy to manage, we suggest using certificates issued by Let’s Encrypt{:target="_blank"}. For more information on this topic, you can refer to online guides such as this one{:target="_blank"}. Please note that this guide assumes that all services have the same certificate, which might not be optimal for higher security needs.
Postfix setup
It is assumed that you are using your operating system's package manager (e.g. apt install postfix) to install Postfix. The following configuration is desired for Postfix:
# TLS setup (we assume the same certs for IMAP and SMTP here)
smtpd_tls_cert_file = /etc/letsencrypt/live/your.domain/fullchain.pem
smtpd_tls_key_file = /etc/letsencrypt/live/your.domain/privkey.pem
smtpd_use_tls = yes
smtpd_tls_session_cache_database = btree:${data_directory}/smtpd_scache
smtp_tls_session_cache_database = btree:${data_directory}/smtp_scache
#smtp_tls_security_level = dane # Works only with the recent postfix
#smtp_dns_support_level = dnssec
smtpd_tls_ciphers = high
smtpd_tls_mandatory_protocols = !SSLv2, !SSLv3
smtp_tls_mandatory_ciphers = high
smtp_tls_mandatory_exclude_ciphers = RC4, MD5, DES
smtp_tls_exclude_ciphers = aNULL, RC4, MD5, DES, 3DES
# Change this for your domain
myhostname = mail.example.com
alias_maps = hash:/etc/aliases
alias_database = hash:/etc/aliases
virtual_alias_maps = hash:/etc/postfix/virtual
myorigin = /etc/mailname
mydestination = example.com, localhost, localhost.localdomain, localhost
relayhost =
mynetworks = 127.0.0.0/8 [::ffff:127.0.0.0]/104 [::1]/128 10.0.0.0/8
mailbox_size_limit = 0
recipient_delimiter = +
inet_interfaces = all
home_mailbox = Maildir/
smtpd_sasl_auth_enable = yes
smtpd_sasl_type = dovecot
smtpd_sasl_path = private/auth # Need to be enabled for Dovecot as well
smtpd_sasl_authenticated_header = yes
smtpd_sasl_security_options = noanonymous
smtpd_sasl_local_domain = $myhostname
broken_sasl_auth_clients = yes
smtpd_sender_restrictions = reject_unknown_sender_domain
mailbox_command = /usr/lib/dovecot/deliver -c /etc/dovecot/dovecot.conf -m "${EXTENSION}"
smtpd_tls_received_header = yes
smtpd_tls_auth_only = yes
tls_random_source = dev:/dev/urandom
message_size_limit = 52428800

# Setup basic SMTP attrs
smtpd_soft_error_limit = 2
smtpd_error_sleep_time = ${stress?0}${stress:10s}
smtpd_hard_error_limit = ${stress?3}${stress:20}
smtpd_recipient_limit = 100
smtpd_timeout = ${stress?30}${stress:300}
smtpd_delay_reject = no
smtpd_helo_required = yes
strict_rfc821_envelopes = yes
# Greeting delay of 7 seconds
smtpd_client_restrictions =
        check_client_access hash:/etc/postfix/access,
        permit_mynetworks,
        sleep 7,
        reject_unauth_pipelining,

smtpd_recipient_restrictions = reject_unknown_sender_domain, reject_unknown_recipient_domain, reject_unauth_pipelining, permit_mynetworks, permit_sasl_authenticated, reject_unauth_destination
smtpd_data_restrictions =
        permit_sasl_authenticated,
        permit_mynetworks,
        reject_unauth_pipelining,

smtpd_end_of_data_restrictions =
        permit_sasl_authenticated,
        permit_mynetworks,
smtpd_relay_restrictions = check_recipient_access hash:/etc/postfix/access, reject_non_fqdn_sender, reject_unknown_sender_domain, permit_sasl_authenticated, permit_mynetworks, reject_unauth_destination, reject_non_fqdn_helo_hostname, reject_invalid_helo_hostname,

# Milter setup
smtpd_milters = inet:localhost:11332
milter_default_action = accept
milter_protocol = 6
You also need to create maps for access control and virtual aliases:
touch /etc/postfix/virtual
touch /etc/postfix/access
postmap hash:/etc/postfix/virtual
postmap hash:/etc/postfix/access
Dovecot setup
For IMAP we recommend to install Dovecot. If you're using a Debian-based system, you can use the following packages:
apt install dovecot-imapd dovecot-sieve
Configuring Dovecot, particularly its authentication mechanisms, is beyond the scope of this guide. However, you can find many helpful guides on the Dovecot main site{:target="_blank"}. By default, Dovecot uses Unix users in system and place mail into the standard mailbox /var/mail/username.
It is important to set up Postfix authentication as well. This is located in /etc/dovecot/conf.d/10-master.conf. Ensure that the following lines in this file are uncommented:
  # Postfix smtp-auth
  unix_listener /var/spool/postfix/private/auth {
    mode = 0666
  }
Additionally, it is recommended to set up Transport Layer Security (TLS) to protect passwords and other sensitive information from being transmitted over insecure connections.
# /etc/dovecot/conf.d/10-ssl.conf

ssl = required
ssl_cert = </etc/letsencrypt/live/<your.domain>/fullchain.pem
ssl_key = </etc/letsencrypt/live/<your.domain>/privkey.pem
Caching setup
Rspamd uses Redis{:target="_blank"} as a storage for non-volatile data:
- a backend for tokens storage and cache of learned messages by statistical module (BAYES classifier)
- a fuzzy storage backend (optional)
and as a cache for volatile data:
- key-value cache storage by many Rspamd modules
- greylisting (delaying of suspicious emails)
- rate-limiting
- whitelisting of reply messages (storing reply message IDs to avoid certain checks for replies to our own sent messages)
Installation of Redis is quite straightforward: install it using the preferred way for your OS (e.g. from packages), start redis-server with the default settings (it should listen on the local interface using port 6379) and you are done.
We highly recommend using separate Redis instance for each module that stores non-volatile data, specifically for the statistical module (BAYES classifier) and fuzzy storage. This multi-instance Redis configuration simplifies administration tasks such as backup and restore, and allows for setting memory limits and eviction policies, as well as establishing data replication between Rspamd installations. For more information on configuring multiple Redis instances, refer to the Redis replication tutorial.
It may also be a good idea to limit the memory used by Redis to a reasonable value, such as:
maxmemory 500mb
Additionally, for Redis instances storing non-volatile data, you might consider setting the volatile-ttl eviction policy:
maxmemory-policy volatile-ttl
Keep in mind that eviction of volatile data keys can cause undesirable effects.
It's important to note that Redis may listen for connections from all network interfaces by default, which can be a security risk. To limit this to the loopback interfaces, use the following configuration directive:
bind 127.0.0.1 ::1
To ensure data is saved to disk, it may also be beneficial to set up overcommit memory behavior, especially for systems under heavy load. This can be done in Linux using the following command:
echo 1 > /proc/sys/vm/overcommit_memory
Rspamd installation
Instructions for downloading Rspamd can be found on the downloads page. This page includes information on how to obtain Rspamd, how to install it on your system, and an alternative method of building Rspamd from source.
Running Rspamd
Platforms with systemd (Linux distributives: Arch, CentOS 7, Debian, Fedora, Ubuntu)
Packaging should include starting Rspamd and configuring it to run automatically on startup during installation.
To confirm that Rspamd is running, you can use the following command:
systemctl status rspamd
Configuring Rspamd
While Rspamd's default configuration is designed to be suitable for most use cases, you may want to make some adjustments to better suit your specific needs or preferences.
Using of configwizard
Starting from version 1.7, a configuration wizard is available as an rspamadm subcommand. This wizard can assist you in configuring popular features in Rspamd, such as:
- Redis server
- Controller password
- DKIM signing for outbound
To run the wizard, use the following command:
rspamadm configwizard
This tool will guide you interactively throughout the configuration process using CLI interface.
Manual configuration
Firstly, refer to the principles of basic configuration here for further reading.
Additionally, it is advisable to utilize the specialized include files as referenced in the default configuration. Typically, each configuration file located in the directory /etc/rspamd/ will incorporate two such includes:
# /etc/rspamd/modules.d/imaginary_module.conf
imaginary_module {
  # there would probably be some settings in this area
  .include(try=true,priority=1,duplicate=merge) "$CONFDIR/local.d/imaginary_module.conf"
  .include(try=true,priority=10) "$CONFDIR/override.d/imaginary_module.conf"
}
Settings in local.d will be merged with stock configuration (where possible: ie. the setting is a list [] or collection {}) where-as settings in override.d will always replace the stock configuration. Unlike rspamd.conf.local and rspamd.conf.override, these include directives are effective inside a given block of configuration ({}). Similarly to rspamd.conf.override settings in override.d have higher priority than settings generated by the web interface, unlike local.d and rspamd.conf.local.
Overriding symbols scores and actions thresholds
You can gain further insight on actions, scores, and related configuration parameters by reading this explanation.
Starting from Rspamd version 1.7, the thresholds setup can be edited in the file local.d/actions.conf:
# local.d/actions.conf

 reject = 150; # Reject when reaching this score
 add_header = 6; # Add header when reaching this score
 greylist = 4; # Apply greylisting when reaching this score (will emit `soft reject action`)
For symbols scores, you should redefine scores defined in scores.d/ directory where they are placed by a symbol's group:
fuzzy_group.conf- fuzzy hashes scoresheaders_group.conf- various headers checkshfilter_group.conf- host filter symbolsmime_types_group.conf- mime types rulesmua_group.conf- MUA related rulesneural_group.conf- neural network produced scoresphishing_group.conf- URL phishing symbolspolicies_group.conf- policies (DKIM, SPF, DMARC, ARC)rbl_group.conf- RBL produced rulesstatistics_group.conf- Bayes statisticssubject_group.conf- subject checkssurbl_group.conf- URL blackslists symbols
The weights of rules can also be modified through the Rspamd WebUI. To obtain current information about symbols and scores, the command rspamc counters can be utilized.
For those who wish to create their own rule or simply adjust the score without considering groups, the file local.d/groups.conf can be used in the following manner:
# /etc/rspamd/local.d/groups.conf

# Just scores for Rspamd defined symbols
symbols = {
  "R_DKIM_ALLOW" = {
    score = -0.1;
  }
  "BAYES_SPAM" = {
    score = 5.0;
  }
}

# Custom user defined symbols and groups
group "mygroup" {
  symbols =  {
    "FOO" {
      score = 20.0;
    }
  }
}
One more note about scores
There are two components of the final score in Rspamd:
score = runtime_score * static_score
Runtime score is a term used to indicate the level of confidence. For example, if you have an IP reputation that varies within the range of [-1;1], and you set the static score for IP reputation to 3.0, then the resulting score would be:
score = runtime_score * static_score = 0.5 * 3.0 = 1.5
This eliminates the need to define specific scores such as
- IP_SCORE_TOO_BAD
- IP_SCORE_BAD
- IP_SCORE_SOMEHOW_BAD
... etc. to differentiate the level of reputation.
Other configuration advice
You should notice that individual files are included within sections:
module { .include "..."; }
Hence, you don't need to repeat module { ... } inside the included file! Rspamd will issue an error in this case: nested section: module { module { ... } }, it is likely a configuration error.
In addition to equivalents to files in /etc/rspamd/modules.d the following includes are referenced in the stock configuration (both of local.d/override.d):
classifier-bayes.conf: included insideclassifier "bayes" {}blocklogging.inc: included insidelogging { }options.inc: included insideoptions { }worker-normal.inc: included inside normalworker {}blockworker-controller.inc: included inside controllerworker {}blockworker-proxy.inc: included inside rspamd_proxyworker {}block
Setting listening interface
Rspamd's normal worker will, by default, listen on all interfaces on port 11333. From Rspamd 1.7.4, it has changed to localhost by default.
If Rspamd is running on the same machine as the mailer or any other application that will be querying it, it is recommended to set this option to 'localhost'. This option should be defined in /etc/rspamd/local.d/worker-normal.inc:
# /etc/rspamd/local.d/worker-normal.inc
bind_socket = "localhost:11333";
If you choose to keep the default settings, it is recommended to use a firewall to restrict access to the machine. For further information on bind_socket and related settings, please refer to the worker documentation.
By default, the Rspamd controller worker listens on port 11334, and the proxy worker uses port 11332.
As Rspamd does not perform certain checks for local networks, it may be necessary to adjust the global local_addrs map accordingly.
# /etc/rspamd/local.d/options.inc

# Local networks (default)
local_addrs = "192.168.0.0/16, 10.0.0.0/8, 172.16.0.0/12, fd00::/8, 169.254.0.0/16, fe80::/10";
Please review the global options documentation for other global settings you may want to use.
Setting the controller password
Rspamd requires a password when queried from non-trusted IP addresses, with the exception of scanning messages which are unrestricted (the default configuration trusts the loopback interface). This is configured in the file /etc/rspamd/local.d/worker-controller.inc.
For better security, it is recommended to store an encrypted password. To generate such a password, you can use the following command:
$ rspamadm pw
Enter passphrase:
$2$g95ywihfinjqx4r69u6mgfs9cqbfq1ay$1h4bm5uod9njfu3hdbwd3w5xf5d9u8gb7i9xnimm5u8ddq3c5byy
The configuration to be modified is shown below, you should replace the password with the output generated from your chosen password:
# /etc/rspamd/local.d/worker-controller.inc
password = "$2$g95ywihfinjqx4r69u6mgfs9cqbfq1ay$1h4bm5uod9njfu3hdbwd3w5xf5d9u8gb7i9xnimm5u8ddq3c5byy";
By setting the enable_password option, data-changing operations, such as Bayes training or fuzzy storage, will require a password for execution. For example:
# /etc/rspamd/local.d/worker-controller.inc
enable_password = "$2$qda98oexjhcf6na4mfujqjwf4qmbi545$ijkrmjx96iyj56an9jfzbba6mf1iezpog4axpeym9qhtf6nhjswy";
From version 1.7, the setting of passwords is also suggested by rspamadm configwizard.
Important information: the default passwords (namely, q1 and q2) are BANNED, so you cannot use them in your installation. Please set the appropriate passwords before using the controller. This is done to prevent an occasional data leak caused by misconfiguration.
Setting up the WebUI
The WebUI is managed by a controller worker, but for added functionality such as TLS support, it may be beneficial to proxy its requests through a tool like Nginx. Below is a minimal configuration needed to accomplish this using Nginx:
worker_processes  2;
user www-data www-data;

pid        /var/run/nginx.pid;

events {
        worker_connections 8192;
        use epoll;
}

http {
    include       mime.types;
    default_type  text/plain;

    sendfile  on;
    tcp_nopush   on;
    tcp_nodelay on;

    gzip  on;

    server {
        listen 443 ssl;
        add_header Strict-Transport-Security "max-age=31536000; includeSubdomains";
        add_header X-Content-Type-Options nosniff;
        add_header X-Frame-Options SAMEORIGIN;
        add_header X-XSS-Protection "1; mode=block";

        include ssl.conf;
        ssl_certificate /etc/letsencrypt/live/your.domain/fullchain.pem;
        ssl_trusted_certificate /etc/letsencrypt/live/your.domain/fullchain.pem;
        ssl_certificate_key /etc/letsencrypt/live/your.domain/privkey.pem;

        server_name example.com;
        location / {
            root /usr/share/rspamd/www/;
            try_files $uri @proxy;
        }
        location @proxy {
                proxy_pass  http://127.0.0.1:11334;
                proxy_set_header X-Forwarded-For $proxy_add_x_forwarded_for;
                proxy_set_header Host $http_host;
        }
        ssl on;
        ssl_protocols TLSv1.2 TLSv1.3;

        ssl_ciphers ECDHE-ECDSA-AES128-GCM-SHA256:ECDHE-RSA-AES128-GCM-SHA256:ECDHE-ECDSA-AES256-GCM-SHA384:ECDHE-RSA-AES256-GCM-SHA384:ECDHE-ECDSA-CHACHA20-POLY1305:ECDHE-RSA-CHACHA20-POLY1305;
        ssl_prefer_server_ciphers on;
        ssl_session_cache shared:TLS:10m;
        ssl_session_timeout 1d;
        ssl_stapling on;
        ssl_stapling_verify on;
        server_tokens off;
    }
}
You might also use subdirs, as suggested by @julienmalik{:target="_blank"}:
location /rspamd/ {
    proxy_pass       http://localhost:11334/;

    proxy_set_header Host      $host;
    proxy_set_header X-Forwarded-For $proxy_add_x_forwarded_for;
}
Alternatively, you could set up HTTP authentication in Nginx itself.
Using of Milter protocol (for Rspamd >= 1.6)
"Starting with Rspamd 1.6, the rspamd proxy worker supports the milter protocol, which is supported by popular MTAs such as Postfix and Sendmail. This feature also renders the rmilter project obsolete in favor of the new integration method. The milter protocol is available only in rspamd_proxy, however, there are two ways to use this protocol:
- Proxy mode (for large instances) with a dedicated scan layer
- Self-scan mode (for small instances)
Here, we describe the simplest self-scan option:
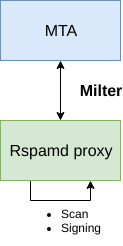
In this mode, rspamd_proxy scans messages itself and talks to MTA directly using the Milter protocol. The advantage of this approach is its simplicity. Here is a sample configuration for this mode:
# local.d/worker-proxy.inc
milter = yes; # Enable milter mode
timeout = 120s; # Needed for Milter usually
upstream "local" {
  default = yes; # Self-scan upstreams are always default
  self_scan = yes; # Enable self-scan
}
count = 4; # Spawn more processes in self-scan mode
max_retries = 5; # How many times master is queried in case of failure
discard_on_reject = false; # Discard message instead of rejection
quarantine_on_reject = false; # Tell MTA to quarantine rejected messages
spam_header = "X-Spam"; # Use the specific spam header
reject_message = "Spam message rejected"; # Use custom rejection message
For more advanced proxy usage, please see the corresponding documentation.
Setup Redis statistics
Starting with version 1.1, it is now possible to utilize Redis as a backend for statistics and caching of learned messages. Redis is particularly recommended for clustered configurations as it enables concurrent learning and checking, and also performs very quickly. To configure Redis, you can specify the redis backend for a classifier, and the cache will automatically be set to the same servers.
# /etc/rspamd/local.d/classifier-bayes.conf
servers = "127.0.0.1";
backend = "redis";
Please review the full statistics documentation for further information as well as the Redis configuration documentation if you plan to use Redis.
Configuring maps
Rspamd also boasts dynamic map support, which allows for lists of values such as domain names or IP/networks to be stored in external files or accessed via HTTP and periodically monitored by Rspamd for updates. This feature is useful for creating custom rules, whitelisting or blacklisting specific networks, among other use cases. An important aspect of maps is that they do not require a Rspamd restart to take effect when the lists are modified. Maps are defined as URI strings:
http://example.com/file.map- HTTP map (server should respectIf-Modified-Sinceheader to avoid unnecessary updates)file:///path/to/map- file map/path/to/map- alternative syntax for file map
All maps behaves in the same way so you can have some choices about how to define a map:
- Plain path to file or http (like
map = "http://example.com/file.txt"ormap = "/tmp/mymap") - Composite path like
map = ["http://example.com/file.txt", "/tmp/mymap"]. Maps data is concatenated from the sources. - An embedded map like
map = ["foo bar"];ormap = ["foo 1", "bar b", "baz bababa"]ormap = ["192.168.1.1/24", "10.0.0.0/8"] - A fully decomposed object with lots of options
For the second option it is also possible to have a composite path with a fallback:
exceptions = [
  "https://maps.rspamd.com/rspamd/2tld.inc.zst",
  "${DBDIR}/2tld.inc.local",
  "fallback+file://${CONFDIR}/2tld.inc"
];
In the example above fallback+file://${CONFDIR}/2tld.inc will be used when the first composite backend is somehow unreachable (e.g. when the first load of Rspamd or all elements are invalid).
Bear in mind that (1) and (3) can only be distinguished by making an array-like map = ["192.168.1.1/24"]
Historically just for the radix map (IP network ones) you could also use map = "192.168.1.1/24" but it is not recommended.
Within maps, you can use whitespace or comments. For example, here is an example of IP/network map:
# Example map
127.0.0.1 # localhost

10.0.0.0/8
fe80::/64
There is a special module called multimap that allows you to define your maps without writing Lua rules. You can check the module's documentation and create your configuration in local.d/multimap.conf.
Configuring RBLs
While Rspamd is free to use for any purpose, it is important to note that some of the RBLs included in the default configuration may require a fee or have usage restrictions. It is crucial to ensure that your use of these RBLs does not violate any rights. The following notes provide additional information about limitations of specific RBLs enabled in the default configuration (you can follow the links for more details):
DNSWL{:target="_blank"} - Commercial use forbidden (see link for definition); Limit of 100k queries per day
Mailspike{:target="_blank"} - Limit of 100k messages or queries per day
MSBL EBL{:target="_blank"} - Organizations that have over 100 users should contact the reseller to arrange for commercial access
Rspamd URIBL{:target="_blank"} - Commercial use forbidden (see link for definition); Limit of 250k queries per day
SpamEatingMonkey{:target="_blank"} - Limit of 100k queries per day or more than 5 queries per second for more than a few minutes
Spamhaus{:target="_blank"} - Commercial use forbidden (see link for definition); Limit of 300k queries or 100k SMTP connections per day
SURBL{:target="_blank"} - Commercial use forbidden (see link for definition); Limit of 1k users or 250k queries per day
UCEProtect{:target="_blank"} - If you're sending 100k queries or more per day you should use the (free) Rsync service.
URIBL{:target="_blank"} - Requires a commercial subscription if 'excessive queries' are sent (numbers unclear).
Refer to the RBL module documentation for information about disabling RBLs/SURBLs.
The following RBLs are not enabled in the default configuration but may be enabled via additional configuration:
Abusix Mail Intelligence{:target="_blank"} - Free for home/non-commercial use up to 100k queries per day (requires registration), commercial use requires a subscription
Using Rspamd
Using rspamc console routine
rspamc implements a feature-complete client for Rspamd. For detailed documentation refer to man rspamc.
Common use-cases for rspamc include:
- Scanning messages stored on disk:
rspamc < file.eml
rspamc file.eml
rspamc directory1/ directory2/*.eml
- Training the Bayesian classifier
rspamc learn_spam < file.eml
rspamc learn_ham file.eml
# In case of multiple classifiers
rspamc -c "bayes2" learn_spam directory1/ directory2/*.eml
- Administering fuzzy storage
rspamc -f 1 -w 1 fuzzy_add file.eml
rspamc -f 2 fuzzy_del file2.eml
- Acting as a local delivery agent (read the integration document)
The rspamadm command
Rspamadm is a utility that enables direct management of Rspamd. It includes an embedded help feature, which can be accessed by typing:
% rspamadm help
Rspamadm 2.6
Usage: rspamadm [global_options] command [command_options]

Available commands:
  configdump         Perform configuration file dump
  configgraph        Produces graph of Rspamd includes
  confighelp         Shows help for configuration options
  configtest         Perform configuration file test
  configwizard       Perform guided configuration for Rspamd daemon
  control            Manage rspamd main control interface
  cookie             Produces cookies or message ids
  corpustest         Create logs files from email corpus
  dkim_keygen        Create dkim key pairs
  dnstool            DNS tools provided by Rspamd
  fuzzyconvert       Convert fuzzy hashes from sqlite3 to redis
  grep               Search for patterns in rspamd logs
  keypair            Manages keypairs for Rspamd
  lua                Run LUA interpreter
  mime               Mime manipulations provided by Rspamd
  pw                 Manage rspamd passwords
  signtool           Sign and verify files tool
  statconvert        Convert statistics from sqlite3 to redis
  template           Apply jinja templates for strings/files
  vault              Perform Hashicorp Vault management
For example, it is possible to get help for a specific configuration option by typing something like
rspamadm confighelp -k fuzzy
See here for more information about rspamadm utilities.
Using mail system utilities
It is also useful to have a simple Sieve script to place all messages marked as spam in the Junk folder. Here is an example of such a script (~/.dovecot.sieve):
require ["fileinto"];

if header :is "X-Spam" "Yes" {
        fileinto "Junk";
}
It is also possible to set up Rspamc to learn by forwarding messages to a specific email address. I recommend using /etc/aliases for these purposes and mail-redirect command (e.g. provided by Mail Redirect addon{:target="_blank"} for Thunderbird MUA). The desired aliases could be the following:
learn-spam123: "| rspamc learn_spam"
learn-ham123: "| rspamc learn_ham"
It is important to use less predictable aliases to prevent messages from being sent to these addresses by an adversary or accidentally, in order to avoid contamination of the statistics.
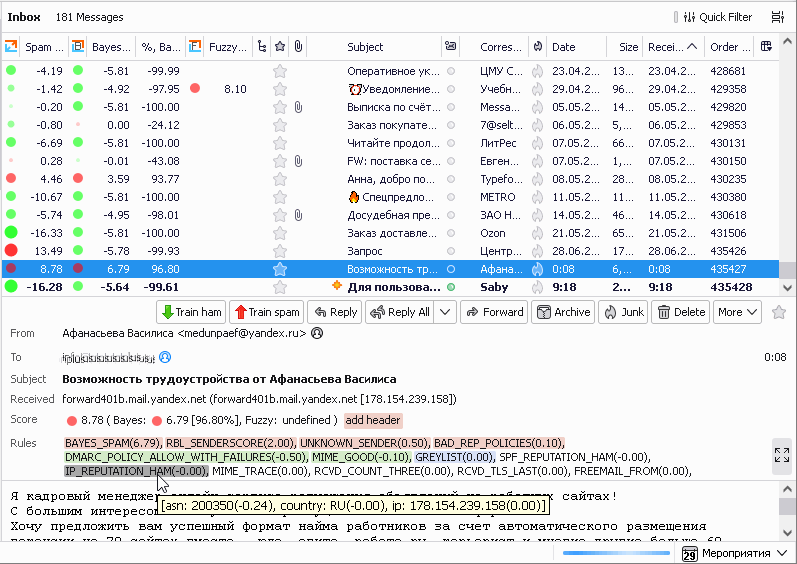
There is also an add-on for Thunderbird MUA written by Alexander Moisseev to visualise Rspamd stats. You can download the latest version from its homepage{:target="_blank"} or a version reviewed by moz://a from Tunderbird Add-ons page{:target="_blank"}. You'd need to add extended spam headers (X-Spamd-Result) with Rspamd proxy worker and/or (from add-on's version 0.8.0) X-Spam-Score and X-Spam-Report headers with Exim to make the whole setup work.
To enable extended spam headers in Milter headers module add the following line to local.d/milter_headers.conf:
extended_spam_headers = true;
To enable headers in Exim refer to the "Integration with Exim MTA" section of the MTA integration document.
Here is a screenshot of this addon in use:
Using the WebUI
Rspamd has a built-in WebUI which supports setting metric actions and scores; Bayes training and scanning messages - for more information see the WebUI documentation.
Using Rspamd in large email systems
Rspamd, designed for large-scale email systems, offers various features to facilitate the processing of emails for thousands or millions of users. Despite this, its default settings are conservative, making it suitable for smaller systems as well.
We recommend obtaining official Rspamd packages from the https://www.rspamd.com website if you are using a Debian-based Linux distribution. These packages are optimized for performance and feature sets. For users on other platforms, we advise contacting Rspamd support (mailto://support@rspamd.com) with your specific needs. There may be optimized packages available for your platform that have not yet been built.
In addition to obtaining optimized Rspamd packages, it is also recommended to set up Redis. Typically, two types of Redis instances are needed:
- Master-slave replicated instances for persistent data: statistics, fuzzy hashes, neural networks. These instances are mostly read-only, so you can distribute the load among read-only slaves.
- Non-replicated but (possibly) sharded instances for volatile data: greylisting, replies, IP reputation, and other temporary data. These instances do not need to be persistent and can be scaled through sharding, which Rspamd will automatically perform if you specify multiple servers. These instances have a mixed read-write workload.
For advanced clustering options beyond what Redis Sentinel offers, we recommend considering the KeyDB project. KeyDB is a drop-in replacement for Redis that supports multi-master replication mode, while maintaining full compatibility with Redis (and Rspamd).
You might also want to enable the following modules:
- IP score: IP reputation module, requires volatile Redis instance (or shared volatile Redis instance). In some cases, it can provide your results common to the expensive IP DNS blacklists. However, it also depends on the quality of your rules and your scale.
- Neural networks: this module provides significant improvement for your filtering quality but it requires CPU resources (SandyBridge or newer Intel CPUs are strongly adviced) and somehow good rules set. It also requires some setup and a persistent Redis instance. From version 2.0 Rspamd uses
libkannfor neural networks which demonstrates better performance and preciseness than the pre 1.7 implementations based onlibfann. Here is a minimal setup for neural networks module:
# local.d/neural.conf
 servers = "redis:6384";
timeout = 25s; # Sometimes ANNs are very large
train {
  max_trains = 1k; # Number ham/spam samples needed to start train
  max_usages = 20; # Number of learn iterations while ANN data is valid
  spam_score = 8; # Score to learn spam
  ham_score = -2; # Score to learn ham
  learning_rate = 0.01; # Rate of learning
  max_iterations = 100; # Maximum iterations of learning (better preciseness but also lower speed of learning)
}

ann_expire = 2d; # For how long ANN should be preserved in Redis
- Ratelimit: this module is highly effective in limiting spam waves, as it allows for temporarily delaying senders with poor reputation or those sending messages too aggressively without a good reputation. A volatile Redis instance is required for its use.
- Replies: whitelists replies to your user's mail. It is very useful to provide users instant communication with known recipients. Requires a volatile Redis instance.
- URL redirector: resolves URL redirects on some common redirectors and URLs shorteners, e.g.
t.coorgoo.gl. Requires a volatile Redis instance. - Clickhouse: saves analytical data to the Clickhouse{:target="_blank"} server. Clickhouse server can be used thereafter to create new filtering rules or maintaining blacklists. It serves as an advanced Syslog with indexes and complex analytics queries. Additionally, there are graphical interfaces available for Clickhouse, such as Redash{:target="_blank"}